

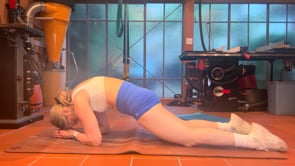
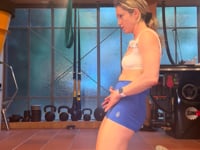
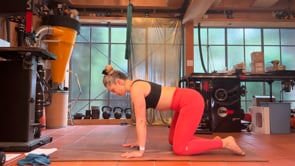
CAT:
Cue: Ninja Butt. (= Squeeze your butt and make it disappear)
Cue: tuck tailbone under & push hips forward (= posterior hip tilt)
Cue: Shorten your stance (= walk hands back towards knees and push into fingertips)
Cue: Push into a little ball (= whole body squeezes in the front/abs to ACTIVELY stretch back of entire spine SAFELY)
Cue: Round your entire spine (neck to tailbone is an arc, like a halloween cat)
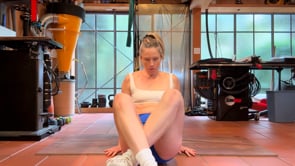
COW:
Cue: Neutral Spine (= there isn't too much arch/hyperextension in low l=back; the curvature is, in fact a neutral spine in the cow posture)
Cue: Brace your core (= push down into tops of feet and palms to lift lower abs up towards your belly)
Cue: Sink shoulders down and back (= shoulders rotate inwards to squeeze shoulder blades down and together)
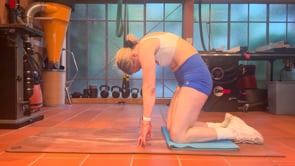
Start from a dolphin position (elbows under shoulders, hips on ground)
Push elbows down as you tuck tailbone under and drag knees towards elbows
Push shoulder blades apart by pushing elbows down into mat and look down (round neck)
Entire spine should be a C-Shape (tailbone to neck is rounded into an arc, like a halloween cat)
Make sure to drive movement from the lower abs contracting upwards from above hips towards belly
Use the traction of knees pulling upwards (towards elbows) ON THE MAT to create resistance (friction of the mat as it scrunches shorter, as seen in the thumbnail if this video) so that you feel which muscles are working/contracting: the lower abs & glutes squeezing.
Most important part: TAILBONE IS TUCKED UNDER
Hips should be lower than shoulders.
Cue: Ninja Butt. = Squeeze your butt and make it disappear :)
Cue: Rounded spine = tailbone to neck is rounded into an arc, like a halloween cat
Cue: cat posture = the cat in the "cat-cow" exercise
Cue: contract lower abs = use the mat as resistance to drag knees upwards while tucking tailbone under, and you will feel these abs fire up!
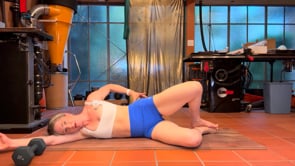
Do 10-15 bridge hip presses (up and down), and hold 10 sec on the last one, focusing on the reverse plank core contraction (ttailbone tucked, ribcage down = straight line in body)
Cues:
-bend knees and place feet in a strong stance
-lift toes so weight is in your heels
-place palms on hipbones
-drive into heels to push hips up to ceiling
-as you push hips up to ceiling push hipbones up into palms, palms down into hipbones
-exhale up, inhale down
-tuck tailbone under & pull ribcage down at the top
Posture is a REVERSE PLANK! = cat engagement of your hips and ribs while pushing hips forward, but because of the vectore of gravity (leaning backwards), it should appear as a straight line from knees to shoulders.
Tip: keep head neutral to gravity or even look down. Do not lean back your neck unless you want neck tension!
Cue: tuck tailbone under as you press hips forward into your palms (= posterior pelvic tilt)
Cue: pull ribcage down (= do not allow back to arch even slightly!)
Cue: squeeze knees together (= this will take the pressure off your knees and add support from you deep frontal line kinetic chain that connects the inside of your hips to your pelvic floor)
Cue: exhale back inhale forward (= helps to engage six pack contraction)
Imagine you are a Viking!

Cat-Cow
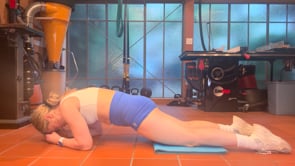
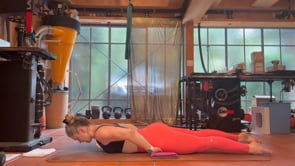
Gymnastics Knee Plank Hold (yes knees!)
Forearm Knee Plank Hold (yes knees!)
Bridge Hip Press
Nordic Hip Press
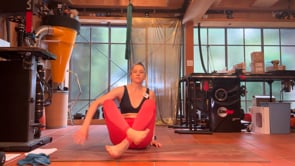
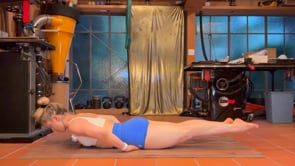
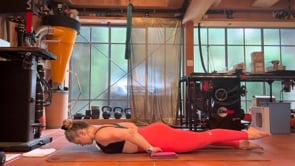
Single Leg Back Extensions
Do this a few times once you have practiced Part A & B and feel to moderately familiar with the deep cues of each posture. Now you are doing all 6 in one circuit.
Next, after a few times practicing this circuit of 6, move onto the Level 2, where we take out the Bridges for smoother transition & more challenge!
Remember, this is a detailed follow along to LEARN all the cues for perfection in your posture, core engagement, & alignment.
The first few times you practice this circuit, go through the exercises along with this video, BUT once you have enough familiarity with the cues move onto the WORKOUT follow along videos, where you can move through the exercises more quickly and activate FLOW STATE.
The WORKOUT follow along videos follow a HIIT (interval training) format, with much faster transitions, and trigger FLOW STATE via keeping the heat in your body & elevated heart rate whilst moving through shorter circuits for 2-4 sets.
Bonus: WORKOUT vids are shorter! (b/c less instruction time - i.e. less rest time; more work:rest ratio)

Only 5 exercises - here we take out the Bridges!
Cat-Cow -> Mobility Rolls
Gymnastics Knee Plank hold
Forearm Knee Plank Hold -> add knee extensions
Nordic Hip Press Hold (option to Lean slightly back) -> Add Archer Pull
Single Leg Back Extensions -> Dorothy Taps
Remember, this is a detailed follow along to LEARN all the cues for perfection in your posture, core engagement, & alignment.
The first few times you practice this circuit, go through the exercises along with this video, BUT once you have enough familiarity with the cues move onto the WORKOUT follow along videos, where you can move through the exercises more quickly and activate FLOW STATE.
The WORKOUT follow along videos follow a HIIT (interval training) format, with much faster transitions, and trigger FLOW STATE via keeping the heat in your body & elevated heart rate whilst moving through shorter circuits for 2-4 sets.
Bonus: WORKOUT vids are shorter! (b/c less instruction time - i.e. less rest time; more work:rest ratio)
Do this routine as often as possible for strong core, hips, joint mobility, and a healthy spine!
How to follow:
Start with just the first circuit. First 5-10 minutes only. Do it everyday at the same time to build routine.
Next, start going further into the video. If something is too hard, skip that circuit or ask me for a modified version.
Finally, memorize the routine and you can start to do it on autopilot anytime you feel like getting into your body!
Tip: do the portions you feel like your body needs that day as a perfect cool down to your independent cardio sessions :)